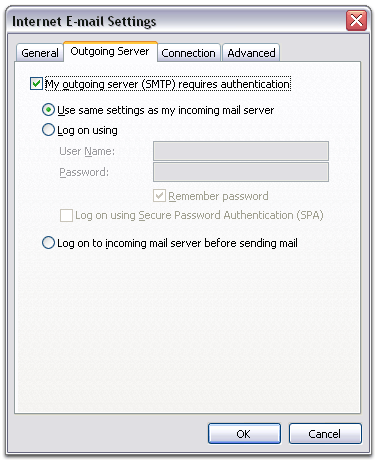
SETTING UP OUTLOOK 2003
1. Open Outlook.
2. Click the Tools menu, and select E-mail Accounts... and click Next
3. Select your default account and click the Change button.
4. Change all the necessary fields to include the following information:

User Information
Your Name: Enter your name as you would like it to appear in the From: field of outgoing messages.
Email Address: Enter your full email address in the format you@yourdomain.com

Server Information
Incoming mail server (POP3): pop.gmail.com
Outgoing mail server (SMTP): smtp.gmail.com

Login Information
User Name: Enter your full address in the format you@yourdomain.com
Password: Enter your password (Do not change your password if it is already entered)
check the box next to Remember password


PLEASE NOTE
Some ISP's will not allow you to use smtp.gmail.com as your outgoing mail server. If your Outgoing Mail Server is already something specific to your ISP please leave it as set and skip steps 6 and 8. (Bellsouth see below).

BELLSOUTH CUSTOMERS
Your Outgoing Mail Server should be "mail.bellsouth.net" and you should skip steps 6 and 8.

   
5. Click More Settings... and then click the Outgoing Server tab.
6. Check the box next to My outgoing server (SMTP) requires authentication and select Use same settings as my incoming mail server.

   
7. Click the Advanced tab, and check the box next to This server requires an encrypted connection (SSL) under Incoming Server (POP3).

8. Check the box next to This server requires an encrypted connection (SSL) under Outgoing Server (SMTP), and enter 465 in the Outgoing server (SMTP) box.
9. To ensure that emails will remain in your webmail after Outlook has downloaded them, under Delivery do the following:
  • Check the box next to Leave a copy of messages on the server
  • Check the box next to Remove from server after 90 days
  • Check the box next to Remove from server when deleted from 'Deleted Items'
10. Click OK.
11. Click Test Account Settings... After receiving Congratulations! All tests completed successfully, click Close.
12. Click Next, and then click Finish.
13. Click Tools menu, select Send and Receive and select Send and Receive All
  PLEASE NOTE: All of your email currently on the old email server has been imported into your new webmail (these are copies of your emails in Outlook). The first time Outlook checks your mail with these new settings it will re-download all these imported messages. The best option is to simply let it do this, then select all the downloaded, unread old emails and delete them.
14. Congratulations! You're done configuring your client to send and retrieve messages. If you experience problems with Outlook, please check Gmail's Common Errors or Troubleshooting pages. If you do not find a solution, please don't hesitate to contact us.